In this guide, I will show you how to set up a WordPress website using a Linux based server with docker. Everything will be based on a single docker-compose file which creates 2 web servers 1 SQL database and traefik for load-balancing and proxy. I assume you have already configured an Ubuntu(16.04) server and installed docker.
-
The first step is to create the necessary folder which we will use to store our persistent data:
mkdir /mnt/dockerdata/wordpress mkdir /mnt/dockerdata/traefik -
Next we are going to install docker compose:
sudo curl -L https://github.com/docker/compose/releases/download/1.18.0/docker-compose-`uname -s`-`uname -m` -o /usr/local/bin/docker-compose sudo chmod +x /usr/local/bin/docker-compose -
When these are installed we can start by creating the traefik config file which we will save in the following location:
/mnt/dockerdata/traefik/traefik.tomlIn this file we need to specify which protocols and ports we are going to use:
defaultEntryPoints = ["http", "https"]
[entryPoints]
[entryPoints.http]
address = ":80"
[entryPoints.http.redirect]
  entryPoint = "https"
[entryPoints.https]
address = ":443"
[entryPoints.https.tls]
[api]
dashboard = true
The above configuration will enable traefik on ports 80 and 443 with SSL enabled on port 443. At the same time, it also enables the API and its dashboard(i encourage to disable the dashboard after testing). Next, we will configure let's encrypt and use the HTTP challenge to get our certificate, as of writing this tutorial the default https challenge is not working and has since been disabled by let's encrypt.
[acme]
email = "example@example.com"
storage = "acme.json"
entryPoint = "https"
onHostRule = true
onDemand = false
[acme.httpChallenge]
entryPoint = "http"
Set the
emailtag to the e-mail address you want to receive notifications on, these will tell you if your certificate will expire of has been invoked. TheentryPointtag defines the port it has to bind the certificate to, these will be set in the first section of the configuration.onHostRuleandonDemandwill set the way traefik will request the certificate for your docker containers.onHostRulewill request the certificate immediately after discovering the container whereasonDemandwill only request the certificate when the site is opened the first time. Because the second option will cause slow site responds we disable that one and use onHostRule instead. -
We now have to create the storage json file where traefik will store its certificates:
touch /mnt/dockerdata/traefik/acme.json chmod 600 /mnt/dockerdata/traefik/acme.json -
Now we can create our docker-compose file and fill it with the containers we want it to configure. Create an empty file somewhere on your server and call it: docker-compose.yml. Next fill in the following template and copy it into the new docker-compose file.
version: '3.3'
networks:
proxy:
external: true
internal:
external: false
services:
traefik:
 image: traefik:latest
 command: --docker
 ports:
  - "80:80"
  - "443:443"
 restart: always
 volumes:
  - /var/run/docker.sock:/var/run/docker.sock
  - /mnt/dockerdata/traefik/traefik.toml:/traefik.toml
  - /mnt/dockerdata/traefik/acme.json:/acme.json
 labels:
  - traefik.enable=true
  - traefik.frontend.rule=Host:<dashboard.example.com>
  - traefik.port=8080
 networks:
  - proxy

db:
 image: mysql:5.7
 volumes:
  - db_data:/var/lib/mysql
 restart: always
 networks:
  - internal
 labels:
  - traefik.enable=false
 environment:
   MYSQL_ROOT_PASSWORD: <secret password>
   MYSQL_DATABASE: wordpress
   MYSQL_USER: wordpress
   MYSQL_PASSWORD: <secret password>

web:
 depends_on:
   - db
 image: wordpress:latest
 restart: always
 volumes:
  - /mnt/dockerdata/wordpress/uploads.ini:/usr/local/etc/php/conf.d/uploads.ini
  - web_data:/home/stlbnlu/www/wp-content
 labels:
  - traefik.backend=blog
  - traefik.frontend.rule=Host:<example.com>
  - traefik.docker.network=proxy
  - traefik.port=80
  - traefik.enable=true
 networks:
  - internal
  - proxy
 environment:
   WORDPRESS_DB_HOST: db:3306
   WORDPRESS_DB_USER: wordpress
   WORDPRESS_DB_PASSWORD: <secret password>
   WORDPRESS_DB_NAME: wordpress
volumes:
db_data: {}
web_data: {}
We now set-up a compose file which will create 3 containers: traefik, DB, web. It also creates 2 networks and 2 storage volumes which will store our site's data.
-
The final step is starting up our compose file and let Docker do the rest, the following will create and start all of the containers. At the same time, it creates an extra copy of the web container which traefik will automatically load-balance. And because we use a central database server and docker volumes all of the websites storage is available to both containers(using this command we can create as many web hosts as we want to). Whenever you want to increase the number of web hosts just change the 2 to whatever number of hosts you want.
docker-compose up -d --scale web=2 -
Wait a couple of seconds as the compose file is pulling the required images and creating the images and we should have 4 running containers. You can check this by running
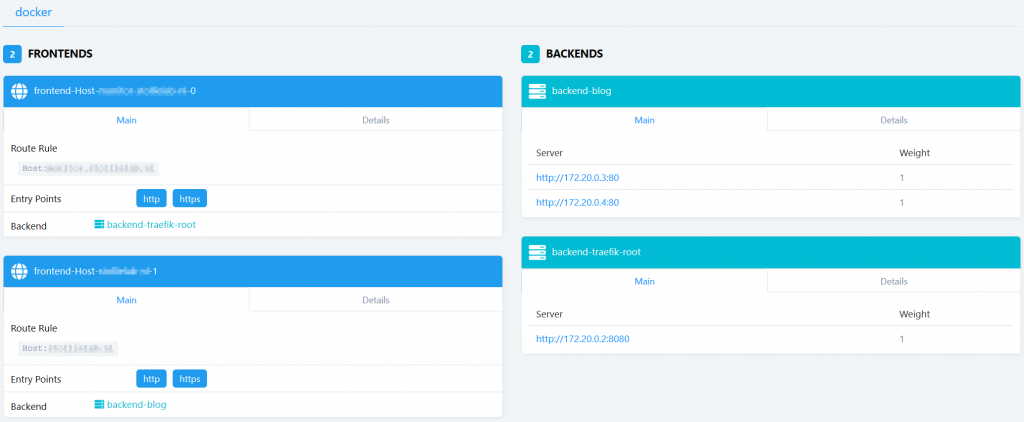
docker pswhich will show all running containers. If you already pointed your DNS names towards this server traefik should automatically request and set-up the correct certificates for our website. Now open a new webpage and browse towards your domain to set up WordPress. By going to the traefik dashboard you should be able to see each of the web hosts and that traefik is load-balancing between the 2. You can find the dashboard by going to dashboard.example.com which you set in step 5.
Now you should have a load-balanced secured WordPress site with the use of docker. Whenever you need to make a change to each of the Docker containers just change the docker-compose file and run the docker-compose command from step 6 again. This will automatically see that you have made a change and only recreate the containers that have been changed. I hope that you have learned something from this post and can see the power of docker. This is just a simple tutorial of how you can create a normally complex web host with only using a single file.